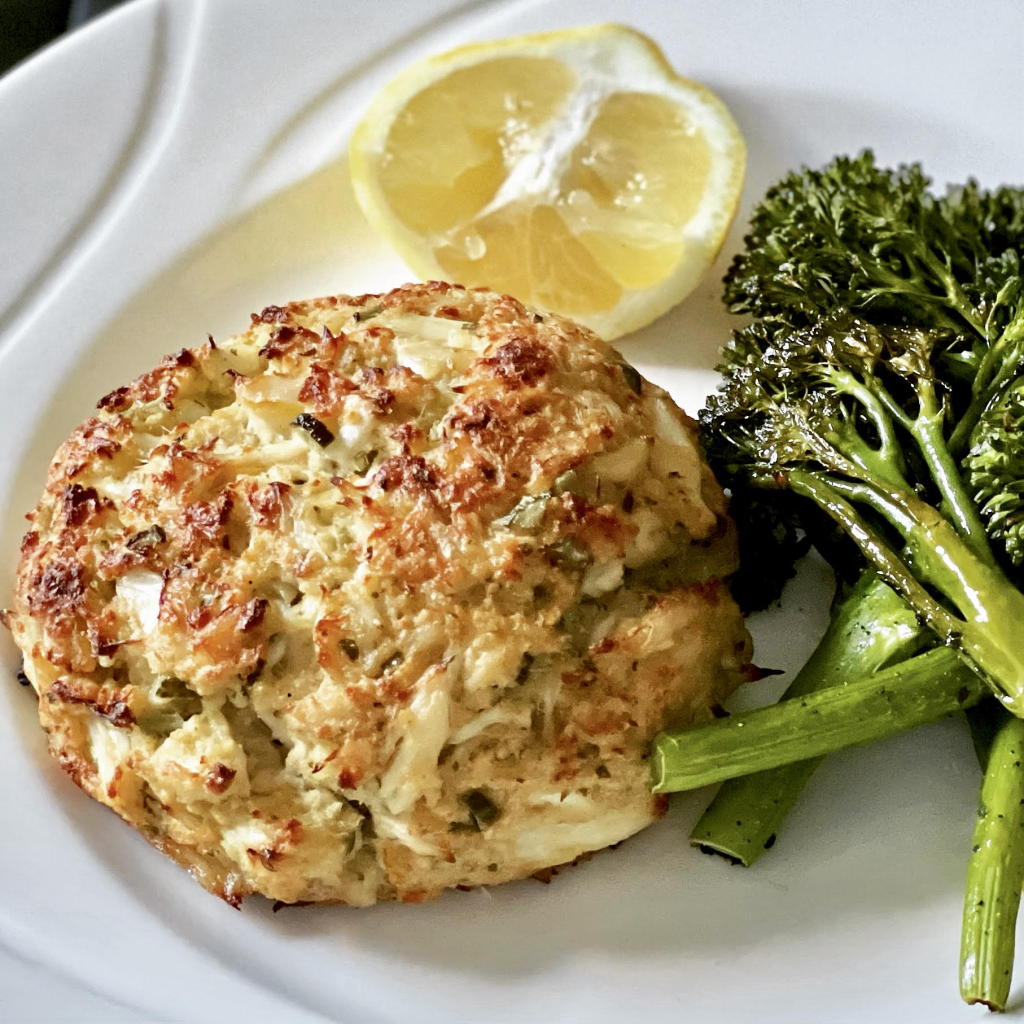
Author Archives for Swati Raje

Happy Diwali!!!

Sharing photos of some of the delicious goodies we made for the holiday this year. It was so much fun to get together to make them them while telling stories and reminiscing about the good old days.

Wishing you and yours a wonderful Diwali filled with peace and joy!!

Chuklees – spiral savory snack made with rice flour, gram flour, moong flour & black gram flour plus sesame seeds and spices.

Khajyache Kanavlé – a specialty of the CKP people of Maharashtra – flaky pastry made with all purpose & semolina flour filled with dry coconut, nuts and spices.

Stuffed Pork Chops

I often make up recipes at the last minute for weeknight dinners based on what I happen to have in the house. With Covid isolation continuing and keeping my trips to the market to a minimum, I’m finding I do it even more often. A few days ago, I defrosted some thick cut pork chops for dinner the next day with no plan whatsoever. After a long day of meetings, I walked into my kitchen after 6pm and had to come up with something quickly. What I made up resulted in juicy, flavorful, perfectly cooked pork chops which I served with a side of steamed asparagus dressed simply with salt & pepper, lemon juice & olive oil. Best part – it was ready in 45 mins including prep.

Stuffed Pork Chops

  • Servings: 2
  • Difficulty: easy
  • Print

Ingredients

    :
  • 2 boneless, thick cut (1.5 inches) pork chops
  • 5 dried apricots chopped fine
  • 1 Tbsp capers chopped fine
  • 1 Tbsp chopped fresh oregano (or substitute 1 tsp dried oregano)
  • 1 inch piece of ginger grated or finely chopped
  • 2 cloves garlic finely chopped
  • 1/4 tsp salt
  • 1/2 tsp freshly ground black pepper
  • 1/4 tsp red pepper flakes
  • 3 Tbsp olive oil
  • 1 Tsp apricot jam
  • salt & pepper to season pork chops
  • 2 Tbsp olive oil plus more to coat the chops
  • 4 Tbsp cold butter (optional)

Directions


1. Preheat oven to 350 F

2. Prepare the stuffing by combining the apricots, capers, oregano, ginger, garlic, salt, pepper, red pepper flakes and olive oil in a bowl. Stir to combine.

3. With a sharp paring knife, cut a small slit into the side of each pork chop to create a pocket being careful not to go all the way through on other sides.

4 . Fill each pork chop with half the filling and then use a toothpick or trussing needle to close the opening.

5. Heat a 10″ cast iron pan on medium high heat until it starts to smoke.

6. While pan is heating, pat dry each pork chop on both sides and season with salt and pepper and rub with a little olive oil to coat.

7. When pan is hot, add the olive oil and place each chop carefully into the pan. You should hear them sizzle as they are placed.

8. Sear for 2 minutes then turn and sear for an additional 2 mins on the other side. Then place the pan in the preheated oven.

9. Finish cooking in the oven for approximately 10 mins until temperature of chop is 140 degrees.

10. Remove from the oven, place pork chops on serving plate and allow to rest for 5 mins tented with foil.

11. If you’d like to make a sauce for your chops, add 4 Tbsp cold butter to the hot cast iron pan and stir briskly to form a sauce from the drippings. Spoon over the chops. I used a compound butter made with rosemary & garlic but plain butter will do just fine.

Fried Chicken

In an attempt to be healthy, I don’t eat a lot of fried foods but every once in a while I crave a really great piece of fried chicken. I like my fried chicken crispy, juicy and flavorful with just the right level of spice. One of biggest challenges though is that I’m not a fan of chicken skin. It sends the unhealthy meter a bit too high for me. So, I’ve come up with a recipe that uses skinless & boneless chicken thighs and still fulfills all my criteria. My son loves it and I’ve received many compliments from friends who have tried it. The garam masala adds an interesting flavor to this recipe. This week I did a comparative taste of my fried chicken and Thomas Keller’s recipe and while his chicken was juicier, I preferred the flavor of mine. A post to a foodie page on Facebook led me to share this recipe with you. I hope you will try it and leave me your comments below along with any suggestions for improvement.

Swati's Fried Chicken

  • Servings: 4
  • Difficulty: easy
  • Print

You can adjust the heat level in this recipe to your taste by controlling the amount of black pepper & cayenne but I recommend you use the noted amount of Sriracha. It adds flavor to the chicken without too much heat.

I use Bell & Evans young chicken which is smaller so most people will eat two per serving. I’m generally satisfied with one. Below recipe assumes two pieces per person. If you use larger thighs, one should suffice.

Ingredients

    : For the Marinade :
  • 8 skinless/boneless young chicken thighs
  • 3 Cups buttermilk
  • 1 Tbsp kosher salt
  • 2 tsp freshly ground black pepper
  • 1 Tbsp Sriracha (you can use other hot sauce if you don’t have sriracha but flavor will be different)
  • For Dredging :
  • 2 Cups all purpose flour
  • 2 Tbsp corn starch
  • 1 tsp kosher salt
  • 2 tsp freshly ground black pepper
  • 1 tsp cayenne
  • 2 tsp garam masala (can be found at Indian markets or some supermarkets in International aisle)
  • 1 Tbsp garlic powder
  • 2 Tbsp sesame seeds (optional)
  • For Frying :
  • 12″ saute pan with minimum 3 inch sides
  • Canola or Peanut oil – enough to fill pan 1/3 full

Directions


1. Marinate the chicken – In a large glass bowl, combine buttermilk, salt, black pepper & sriracha and stir well to combine. Add chicken thighs and mix to coat completely submerging all if possible. Refrigerate overnight (I do this the evening before I plan to cook the chicken)

2. Prepare the dredging flour – In a shallow plate or bowl, combine all the dredging ingredients and mix well.

3. Heat oil to 325 F (160 C) on medium heat (adjust stove to maintain temperature throughout cooking)

4 . Remove chicken one piece at a time from the buttermilk marinade and dredge into flour mixture, turning until completely coated making sure it gets into every crevice of the thigh.

5. Place on a parchment lined cookie sheet and allow to rest for 5 mins

6. Carefully and gently place chicken into the hot oil – smooth side down. I recommend frying in two batches of four thighs each.

7. Cook chicken for 5 – 6 mins until golden brown then turn. Cook another 5 – 6 mins. You can check the chicken for doneness with a thermometer – 165 F and add cooking time if needed.

8. Remove and drain on cooling rack set over a cookie sheet to retain crispness

9. Serve hot for optimum experience.

Grilled Peaches w/ Balsamic Soy Ginger Glaze

One of my favorite things about summer is the variety of local fruit available in the farmer’s markets and grocery stores. I love them all from the berries, to plums to watermelons and beyond. But really great peaches are my favorite. I like nectarines too but there’s nothing like a perfectly ripe peach – a texture and flavor that nectarines just don’t ever achieve. So, why do I love peaches so much? There’s something about a peach that takes me back to my younger days of eating delicious mangoes in India in the month of May, and my nostalgia swings into full gear as I find there are many similarities in the two fruit. If you’ve ever had an Alfonso mango, you may understand what I mean.

In addition to enjoying peaches by just taking a bite out of them, I find this fruit extremely versatile in recipes too. Off season, I keep a bag of frozen peaches in the freezer at all times. Aside from the usual peach pie or cobbler, I’ve also used peaches in savory recipes like peach salsas to serve over grilled fish, or blended them into my chicken curry to add an interesting balance of flavors. I’ve added them to bread pudding and used less ripe peaches to add a crunch to salads. Yesterday, I was planning a quick and easy outdoors dinner for a friend who was dropping by and while driving to the grocery store, thought about making grilled peaches. By the time I arrived at the store, I had envisioned this recipe in my head based on what I knew I had in my pantry. All I needed to buy was the peaches.

I loved the way this recipe turned out – a great balance of sweet, acid & salt with a hint of heat from the ginger & cayenne. It was the perfect, summer, no fuss dessert that I was able to prep and serve outdoors to accommodate these days of social distancing.

Grilled Peaches with Soy Balsamic Ginger Glaze & Basil

  • Servings: 4
  • Difficulty: easy
  • Print

For grilling, I like semi firm peaches as I find they taste better when you’re adding a sweet glaze on top. They’re also easier to work with on the grill. You can certainly make this recipe with ripe peaches too, but I usually prefer to eat those raw.

If you’d like to add another component, you can top the peaches with some goat cheese or blue cheese before adding the glaze.

Ingredients

    For the Glaze :
  • 1/2 Cup brown sugar
  • 1/2 Cup water
  • 2 Tbsp Balsamic Vinegar
  • 2 tsp Soy Sauce (I used low sodium)
  • 2 tsp grated fresh ginger
  • 1/8 tsp cayenne pepper
  • For the Peaches :

  • 4 Semi-firm Peaches – halved & pit removed
  • 1 Tbsp Olive Oil
  • 6 – 8 Fresh Basil leaves torn roughly with hands (do this just before you add to the top)

Directions


1. Make the glaze – add all ingredients in a small sauce pan and heat over medium low heat to a boil stirring occasionally. Once the sugar has melted, continue to boil (stirring frequently) till liquid has halved and is thick enough to coat a spoon. Set aside until ready to use.

2. Prepare the peaches by rubbing the cut side with olive oil

3. Heat your grill with burners on medium low so it maintains a constant temperature of 400F.

4 . Once the grill is hot, place the peaches on the grill cut side down and close the cover. Allow to cook for 5 – 10 mins until you see the grill marks clearly, then turn them and cook another 5 mins. The peaches will have softened but still feel firm.

5. Remove peaches to a serving plate and drizzle with the glaze. If the glaze has hardened, you may need to reheat for a few minutes (I placed the sauce pan straight on the grill to do this) to loosen up.

6. Tear and sprinkle the fresh basil on top and serve warm.

Chole – (Chickpeas in a creamy tomato curry)

Chole (pronouced Cho-lay) is a popular vegetarian dish in India usually served with rice or paratha. It is easy to make and can be ready very quickly if you use canned chick peas, making it ideal for a fast weeknight meal. Sometimes, I’ll add chopped spinach leaves to make it a true one-pot meal. This recipe is not from any particular tradition but one that I have developed over the years to my own taste.

Chole

  • Servings: 2
  • Difficulty: easy
  • Print

Chickpeas in a spice tomato gravy(curry)


Garam Masala is a blend of warming spices like cinnamon, mace, nutmeg, cloves, cardamom, and black pepper that can be made fresh at home or bought at any Indian grocer. I often find it in the International aisle of many supermarkets also.

Ingredients

  • 4 Tbsp canola oil
  • 2 inch cinnamon stick
  • 1 medium onion, chopped
  • 1 inch piece of fresh ginger, grated
  • 3 cloves garlic finely chopped
  • 1 tsp ground cumin
  • 1 tsp ground coriander
  • ½ tsp cayenne
  • 1/2 tsp ground turmeric
  • 1/2 tsp salt (or to taste)
  • 2 Tbsp tomato paste
  • 1 15.5 oz can chick peas, drained
  • 1 tsp garam masala
  • 2 Cups fresh spinach, roughly chopped (optional)
  • ¼ cup chopped cilantro (optional)

Directions


1. In a large sauce pan, heat the canola oil with the cinnamon stick on medium heat.

  1. When the cinnamon starts to sizzle, add the chopped onion and stir until it softens.
  2. Add the cumin, coriander, turmeric, cayenne, and salt and stir to combine and cook for 1 minute until the spices are fragrant.
  3. Add the garlic & ginger and stir and cook for one more minute
  4. Add the tomato paste and combine thoroughly with the onion & spices. Continue to cook until tomato paste starts turning brown from caramelization.
  5. Add 1 Cup water and stir.
  6. At this point, add the spinach if using and cover to cook until just wilted (about 2 mins).
  7. Add chick peas and stir to heat through.
  8. Finish with garam masala & cilantro, if adding stirring to combine
  9. Serve over hot basmati rice or with paratha, roti, or naan. I also like chole with a good baguette.

As many of my friends turn to vegetarian or vegan options, Indian food becomes the perfect choice with its many ways to cook vegetables and legumes. Chickpeas, when combined with a starch like rice or bread, form a complete protein, thus providing a nutritious alternative to meat. I hope you will try this recipe at home and enjoy it as much as we do.

1 2 26
%d bloggers like this: